
Designing a Viral Clearance Study – A Step by Step Tutorial
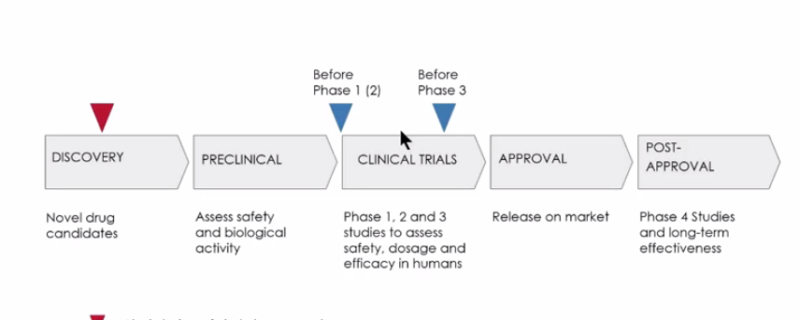
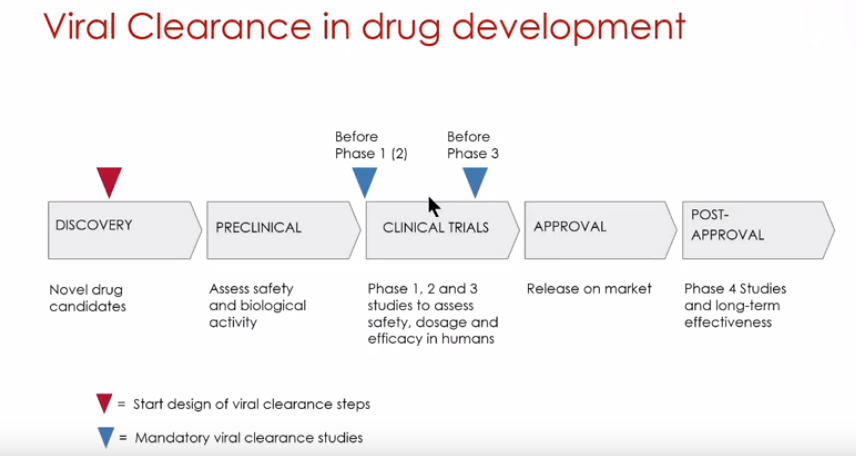
Viral clearance testing is a regulatory requirement and critical part of the overall approval process for all biologics. Viral clearance testing is performed at two points in biologics development. Before Phase I clinical trials, viral clearance studies are conducted to demonstrate the capability of a downstream purification process to eliminate potential viral contaminants. More extensive viral clearance studies are then conducted again before Phase III clinical trials (Figure 1).
In the following tutorial, Vironova Biosafety describes how to design a viral clearance study, including what virus removal or inactivation steps should be present and what virus panel should be used in the testing. Also covered is the importance of keeping the process parameters true when down scaling and how to calculate the robustness of the virus clearance steps.
The tutorial is presented by Gustav Gilljam, Client Project Manager, Vironova Biosafety. Mr. Gilljam begins with a discussion about the different phases when viral clearance studies should be conducted (Figure 1). He explains the importance of early planning and creating a safety by design plan.
The first step, he goes on to say, is to assemble a virus panel of all relevant viruses. This includes all known viruses, such as pathogenic viruses that are known contaminants. Specific model viruses, which are viruses closely related to the known virus to be used when the known virus is too difficult to handle. Also non-specific model viruses should be used to cover missing virus classes as a safeguard against adventitious and unknown viruses.
Next Mr. Gilljam shared a chart of plasma-borne viruses and their models including important information about each virus.
He walked through when and how the virus inactivation step should take place and that it removes mostly enveloped viruses prior to purification. He then explained how the virus filtration step should take place after purification and since it is more robust, should remove even smaller non-enveloped viruses like parvo.
He then discusses the importance of an accurate down scale model to ensure good manufacturing results. He explained how the key to a good down size model is keeping all the parameters true to the manufacturing plan.
He also shared his thoughts on the requirements for robust virus reduction. These include at least two orthogonal steps that are mechanistically different. Each step should be tested against several different virus types. High log virus reduction should be achieved with virus reduction of at least four logs obtained in two or more steps. Lastly, testing should be conducted at process parameter limits where virus survival is most likely, considered worst-case conditions. Testing can also conducted outside of the process parameter limits for an even more robust test.
To close, Mr. Gilljam walked through the four steps of a viral clearance study including the protocol, pre-study, main study and creation of the viral safety report. He walked through the main study components in detail.
The tutorial offers a very informative look at the creation of a viral clearance testing plan with step by step details.
Learn more at https://www.vironovabiosafety.com/